If you’re using cool Samsung Galaxy S8 or S8 Plus and looking for a simple guide to root it. You’re at the right Page. Many of the Galaxy S8 and S8+ want to install TWRP recovery and root the Galaxy S8 and S8+ Android smartphone. Read on!
The real performance of an Android smartphone can only be unlocked once it is rooted. Rooting gives you a lot of features which we don’t usually get with Stock ROM. You can overclock even under-clock your phone to increase its performance or save battery.
There are lots of other features as well. On Google Play Store certain apps which work much better with Rooted Android device. However, it does come with its set of warnings. But don’t worry, just follow the guidelines properly.
WARNING!
We (droidopinions) will not be held responsible for any kind of damage occurred to your Galaxy S8, while following this tutorial. Do it on your own risk. This method will work on the Exynos variants of the Samsung Galaxy S8 and Galaxy S8 Plus.
Pre-requisites
- Make sure your device has more than 60% battery.
- Download and Install Samsung Drivers On your PC.
- Enable USB debugging and OEM Unlock option.
- Go to Settings > About Phone > Software info, and tap the Build number repeatedly until you see a message that says “You are now a developer”.
Downloads
- TWRP for Galaxy S8 (Exynos vaiants – G950F/FD/N/X) | Download
- TWRP for Galaxy S8 Plus (Exynos variants – G955F/FD/X/N) | Download
- Latest Odin 3.12.3+ | Download
- Samsung mobile drivers | Download
Root and Install TWRP Recovery on S8 and S8+
1. Make sure you downloaded all the required files from the above provide links. Also, ensure that USB debugging is enabled.
2. Transfer the TWRP tar file from the download section to your desktop.
3. Now double click ODIN.exe to Launch Odin.
4. Switch off your device to boot into Download Mode.
5. To do so Press and hold Bixby + Volume down buttons and then press the Power button.
6. Your device will boot into download mode.
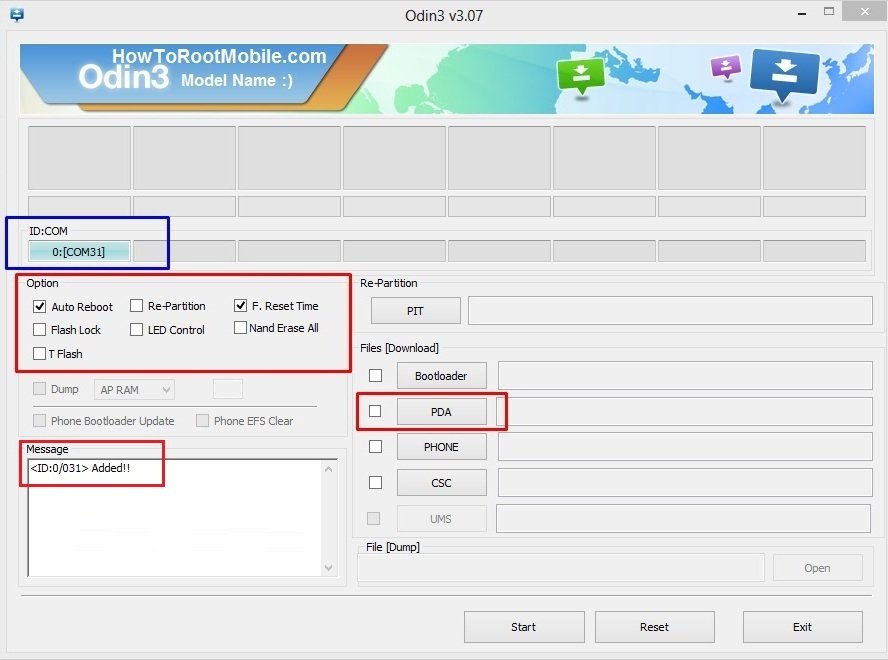
7. Now using original USB cable connect your phone to the PC. If the drivers are properly installed you should see Added!! message in the ODIN window.
8. Now click on the AP/PDA tab in the ODIN window and select the TWRP recovery.Tar file (from your desktop).

9. Ensure that the Auto Reboot option on Odin window is unchecked.
10. Check everything again and then hit the Start button to flash the TWRP on your S8.
11. You should see a PASS! Message in the Log tab, TWRP is installed.
12. Disconnect your phone from the PC.
Root Now
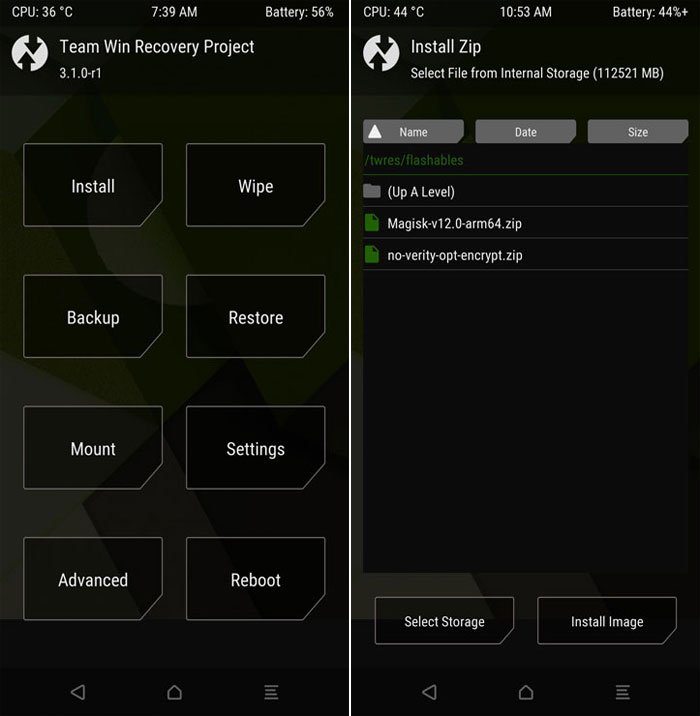
1. Boot into TWRP recovery by turning it off and holding Volume down + Power button.
2. Once you are in recovery mode, tap the Install option in TWRP menu and then navigate to the folder /twres/flashables/
3. You will see two files there , see the screenshot below.

4. To disable encryption/dm-crypt, just simply flash “no-verity-opt-encrypt.zip”. It will disable dm-crypt and make /data encryption optional.
5. Go to the Wipe menu to wipe your /data partition to finally disable encryption.
6. Next, flash “Magisk-v12.0-arm64.zip” to root your Device.
7. Once Flashing is finished, Reboot your Android phone.
So, that was it! Now your Samsung Galaxy S8 or S8+ is rooted along with TWRP recovery installed. For queries, reach us out via comment section.