The latest Flagship of Most Popular Series of Samsung, Galaxy Note 8 has just been released. I am here to show you how you can root Galaxy Note 8 N950F, N950FD using CF-Auto Root. Galaxy Note is an epic device which is in a League of its own. Having one of the most powerful internal hardware among all the latest phones out there. Now if you are and Android phone geek like me, first thing to done is to root Galaxy Note 8. I will show you how you can do this without messing up with your phone.
Most of the newbie users don’t know how to root their phone and neither they are able to find proper instructions for it. I will explain the step by step process to Root Galaxy Note 8 N910F or N910FD. Rooting the phone allows you to unlock the phone to its very cores, you can do a lot of customizations and third party tweaks after rooting the phone. Which otherwise would be impossible.
Root Galaxy Note 8 Exynos N950F, N950FD
Rooting is the key to open every software restrictions offered by the system to the user and other functions. By rooting the phone, all the internal software restrictions are removed by the system so that user is able to control permissions for every task on the phone via an app called Super SU. From here, you can Root Galaxy Note 5 N920I or N920T with CF-Auto-Root via Odin flash process.
You may be familiar with Odin. Odin is Samsung’s official tool to flash/install update files on Samsung phones manually. Flashing CF-Auto-Root file on Galaxy Note 5 will install inject the root package in the system and your phone will be rooted with Super SU installed on it.
Disclaimer:
Rooting the phone is an unofficial process and will void the warranty of the phone. This process is only to Galaxy Note 8 N950F or N950FD. Do not try this on any other phone. Try this at your own risk. We will not be responsible if anything wrong happens with your phone.
Before Rooting Galaxy Note 8 Exynos
- Check the model of your phone first by going to settings>>about phone. Make sure it is SM-950F or SM-N950FD, then proceed.
- Backup your important data like pictures, videos, messages and contacts etc for safety.
- charge your phone up to 60% to avoid power failure issues.
- Your PC should have Samsung USB Drivers installed.
Download TWRP for Galaxy Note 8 N950F, N950FD
First of all you would need to install twrp recovery on galaxy note 8. After that you can install SuperSU on Galaxy Note 8.
Download: TWRP for Galaxy Note 8 N950F/FD
Download: Odin
Above two files should go on PC.
Below File must be downloaded on Phone.
Download: Super Su (Download it on phone).
Steps to Install TWRP Recovery On Galaxy Note 8
- Download twrp recovery from above link and extract it.
- Download odin and extract it.
- Now on your phone go to Settings>>AboutPhone. Tap on Build No seven times. This will enable developer options.
- Go to developer options in settings and enable USB Debugging Mode.
- Now power off your phone.
- After it is powered off. Press and hold, Volume Down+Bixby+Power buttons together until the warning screen appears.
- Now press volume Up button to continue.
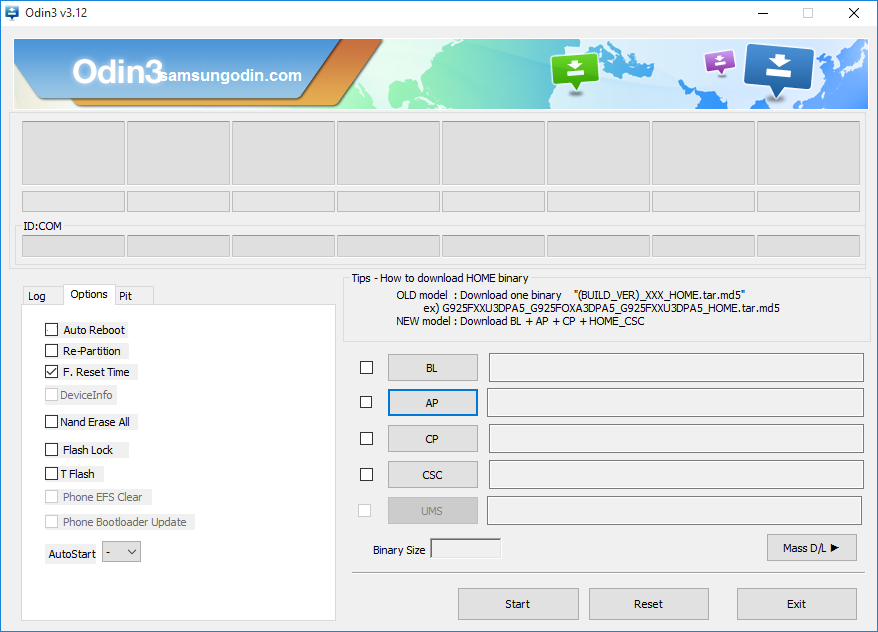
- After that, on your PC. Launch Odin. Click on AP/PDA option, select the extracted twrp file that you downloaded above.
- In the Odin, Make sure only F.Reset Time option is checked and all other optiona are unchecked.

- Now connect your Note 8 to the pc while it is download mode.
- Odin will now detect your phone and one of the boxes above will be highlighted.
- Click on the start button.
- Wait for some time.
- A pass message will appear when the process completes.
After this step, you don’t need to turn on your phone. Because it will replace twrp recovery with stock recovery. You need to directly go into twrp recovery mode. So for doing this proceed to the below further steps.
- Now disconnect the device. While your phone is still in Download mode,
- Press and hold Volume Down+Bixby+Power button. Keep holding the buttons until the screen goes black. When the screen goes black immediately release volume down button and hold Volume up button instead while still holding the Bixby and Power button. You will now enter into Recovery menu. Release the buttons.
After installing the TWRP Recovery on Galaxy Note 8 N950F or N950D. You can root Galaxy Note 8 N950F or N950FD. For rooting the phone, follow the procedure below further.
Root Galaxy Note 8 N950F, N950FD
- In the Recovery menu, Check the Box (never show this screen during boot again) and then Swipe to Left to allow modifications.

- At this point you are in TWRP recovery menu.
- Tap on the install button.
- Select the Super Su.zip file that you have downloaded in your phone.
- Swipe to install the Super Su.zip on your phone.
- When it is flashed. There will be two options on the screen below.
- First tap on wipe cache/dalvik.
- Then after that Reboot the device.
- Your will devic will reboot now.
- Have patience, it may take some to show the homescreen.
You are successful to root Galaxy Note 8 N950F/N950FD exynos version. Drop your comments below. Share this post and subscribe.

Custom binary. Binary Blocked by FRP Lock. Android pie
Custom binary. (Binary Blocked.) Message. My note 8 OS is Android 9 pie.