Samsung Galaxy S5 is a breathtaking android device in the famous Samsung Galaxy S series. The Samsung Galaxy S5 is a fantastic smartphone with many new features, hardware improvements and amazing specs. Samsung Galaxy S5 is a successor to Galaxy s4. Samsung has push the limits in introducing the new Galaxy S5. It is the first android smartphone by Samsung which is Water Resistant. The galaxy S5 is IP 67 certified meaning that it is water resistant and dust resistant. Apart from water and dust resistant Samsung has put the all new feature to recognize the fingerprint in Galaxy S5, that’s right folks Galaxy S5 has a fingerprint sensor. You can unlock your Galaxy S5 by placing your finger on the Home Button. The Galaxy S5 is backed up by powerful Snapdragon 801 Quad-core 2.5 GHz Krait 400 processor, 2 GB of ram and 16/32 GB internal storage. Galaxy S5 supports micro SD card up to 128 GB. Camera is pretty awesome, 16 MP, 5312 x 2988 pixels capable of recording 4K video. The Galaxy S5 has a beautiful Super AMOLED display with a pixel density of 432 ppi (1080×1920 pixels.
Many users want to root their Galaxy S5 after spending some time with their device. They want to do a lot of stuff on their phone like installing custom recovery, custom roms and for this purpose they need to root their phone. Today will show you how to root your Galaxy S5 with CF-Auto root method. Just Follow the instructions below.
Why to Root Galaxy S5
Rooting is a process by which user gets full access over his phone software restrictions and sub systems. Rooting the phone removes all the software restrictions. There are many amazing apps which require root access and we can’t use them until our phone is rooted. Also we can overclock the CPU of our phone by rooting. If you want to install custom roms, recoveries on your galaxy S5 then the first thing you need to do is root you Galaxy S5.
Note: This method is only for Galaxy S5 SM-G900F model. Don't try this on any other variant. The methods works perfectly on Galaxy S5 SM-G900F, i have tried this. If you do not do this carefully you may mess up your phone and If some thing wrong happens with your device then Droidopinions.com will not be held responsible for this. So, try this at your own risk. The method works with all stock firmwares of Galaxy S5 SM-G900F i,e Kitkat and Lollipop.
Disclaimer
By rooting the Galaxy S5 SM-G900F the KNOX counter of your phone will be tripped and you will void your phone’s warranty.
Materials Required
- Galaxy S5 SM-G900F
- USB Data Cable
- A PC or a Laptop
Necessary Instructions Before Proceeding
- First of all Confirm the model of your Galaxy S5 by going to Settings>>General>>About Phone>>Model No. The CF-Auto Root files works only with Galaxy S5 SM-G900F.
- Backup your important data like Contacts, SMS, Call Logs, Pictures, Videos etc. So, you might not loose them if something goes wrong.
- Charge your phone battery to maximum ( above 60%) to avoid power failure issue.
- Ensure that the USB Data cable of your phone is perfectly working.
- Your PC should have Samsung USB drivers installed.
Download Required Files
Download the files below.
How to Root Galaxy S5 SM-G900F
Step-1
- First of all extract the the downloaded CF-Auto Root package to get a tar.md5 file extension.
Step-2
- Now on your phone enable the USB Debugging mode by going to Settings>>General>>Developer Options and enable the USB Debugging mode. If you do not find any developer options than go Settings>>About Phone and tap on Build number seven times this will enable Developer Options on your phone.
Step-3
- Turn off the device and enter into download mode by pressing and holding Home+Power+Volume Down buttons together. A warning screen will appear from there press the volume up button to get into download mode.
Step-4
- Now extract and open Odin on your computer.
Step-5
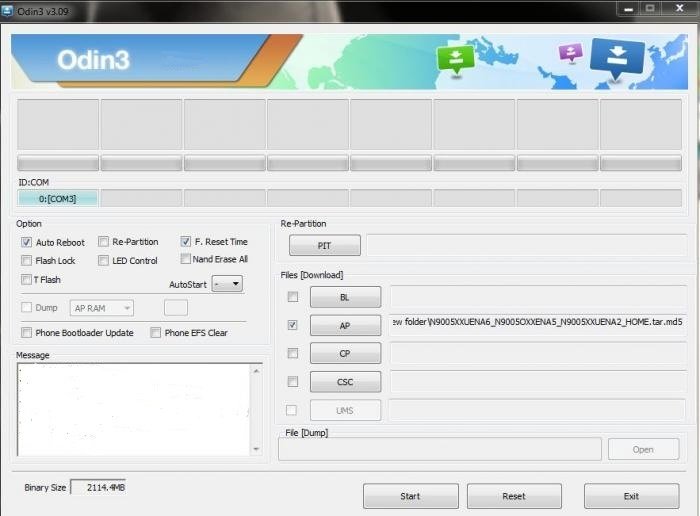
- Connect your Galaxy S5 to the computer, you will see that the ID Com box in the Odin will turn yellow or blue this means that your device is connected successfully. Make sure that the F.Reset Time and Auto Reboot boxes are checked.
Step-6
- After that click on PDA/AP option in the Odin and select the extracted tar.md5 extension file.
Step-7
- Check the procedure again so that all is set completely.
Step-8
- Now click on the Start Button to begin the process. The Odin will start flashing the device.
Step-9
- After the process is completed successfully a PASS message will appear on the Odin. Your phone will reboot, you can now disconnect the cable.
Check and Verify Root Access
If you want to check that whether your phone is rooted or not find the Super SU app in the apps menu. If you find the Super SU app in the apps menu then your phone is rooted. You can also verify the root access on your phone by downloading an app called Root Checker from Google Play Store.
Download Root Checker
That’s it guys you have rooted your Galaxy S5. Thanks for following my tutorial. Please like and share. If you have any questions ask me in the comments section.
Troubleshooting
If your device does not reboot automatically then do the entire process again. Still if you are having problem then this time uncheck the Auto Reboot option and start the procedure. After appearing the Pass message on Odin, disconnect the device, pull out the battery to switch off the phone forcefully, put back the battery and press and hold the Home+Power+Volume UP buttons together and wait to boot your phone into recovery mode. Your phone will automatically do the installation process and will be rebooted.


