Galaxy Note 3 is an amazing Smartphone phablet from one of the biggest phone brand Samsung. Galaxy Note 3 is a successor to Galaxy note 2. Samsung has push the limits in introducing this device. Galaxy Note 3 has an incredible, elegant slim design. This device is equipped with Samsung’s famous stylus S-Pen feature and S-Pen is a default factory accessory for every Samsung’s Galaxy note. Galaxy note 3 got half of its fame through its realistic design. The design of Galaxy Note 3 is awesome, in contrast with previous Galaxy Note devices Galaxy Note 3 has a much premium look and feel and also it is very thin smartphone available yet.
Like its everlasting design Galaxy Note 3 has some great features and hardware. You all Know it has S-Pen which enhances its productivity making it best for students and office persons. So, apart from its S-Pen Galaxy note 3 has very powerful performance package packed in. It has Exynos 5 Octa 5420 Quad-core 1.9 GHz & quad-core 1.3 GHz processors, 3 GB of Ram and 16/32/64 GB of Storage with expandable option of micro SD Card upto 64 GB. Camera is excellent 13 MP, 4128 x 3096 pixels capable of recording 4k video with autofocus and LED. Galaxy Note 3 comes in different colors, Black, White, Pink, Merlot Red, Rose Gold Black, Rose Gold White. So, in short Galaxy Note 3 is a powerful fast and features rich device with a tasty look.
Now if we talk about operating system of Galaxy Note 3 currently the latest OS for this device is 5.0 Lollipop. It did’t got 5.1 lollipop update. Like the increase in updates of Android OS there is also an increase in custom roms which enables us to modify our device’s software and for installing a custom rom a custom recovery is necessary and today i will show you how to install a custom recovery on your Galaxy Note 3.
CWM Custom Recovery for Galaxy Note 3 N900
As there is an increase in custom roms so having a custom recovery is must for installing a custom and there are many users who want to enjoy custom roms on their device. Basically a Custom Recovery has many functions, it can flash a custom rom, make the complete backup of phone’s data and software and it can wipe dalvik cache system cache and can install any update.zip. So custom is used for different tasks.
From this guide you can install CWM Custom Recovery on your Galaxy note 3 very easily. Just follow the step by step instructions.
Note
- For installing a custom recovery on your Galaxy note 3 N900 you should have your phone rooted. Refer to the guide below if your phone is not rooted.
Root Samsung Galaxy Note 3 N900
Disclaimer
This method is only for Galaxy Note 3 N900 do not try this on any other model. You should not try this if you are completely unaware of this. The method is unofficial and both rooting and installing custom recovery will void your device warranty. If something wrong happens with your device then Droidopinions.com will not be held responsible for this so, try this at your own risk. Do the whole process very care fully, thanks.
Material Needed
- Galaxy note 3 N900
- A PC or Laptop
- Official USB Data Cable.
Necessary Instructions before Proceeding
- First of all confirm the model of your Galaxy Note 3 by going to Settings>>About Phone>>Model No. The method is only for N900 model of Galaxy Note 3.
- Backup your important data like contacts, pictures, videos etc so you may not loose it if your device gets messy.
- Your PC should have Samsung USB drivers installed
- Your phone should be charged above 60%.
Downloads Required
How to Install CWM Custom Recovery on Galaxy Note 3 N900
Step-1
- Extract the downloaded CWM recovery to get a tar.md5 file format.
- Extract Odin.zip
Step-2
- On your device go to settings>>Developer Options scroll down to USB Debugging options and enable it. If you do not find any developer options then go to Settings>>About Phone and tap on Build Number seven times repeatedly this will activate developer options on your phone.
Step-3
- Now turn off your Galaxy Note 3.
Step-4
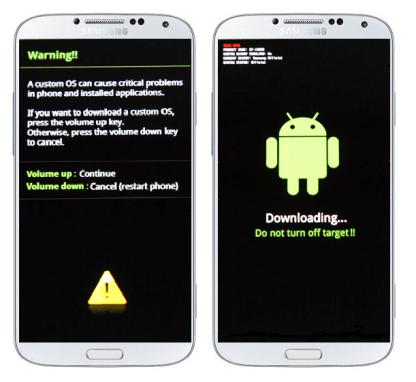
- Enter into download mode by pressing and holding Home+Volume Down+Power button for a few seconds. A warning screen will appear, from there press the volume up button to confirm the task.
Step-5
- Now Run Odin on your PC.

Step-6
- Connect your device to the computer through USB Data cable.
- The ID:COM box in the odin will turn blue after you connect your device to the computer. This means odin has detected your device.

Step-7
- Now click on AP or PDA option in Odin and select the extracted CWM recovery file.
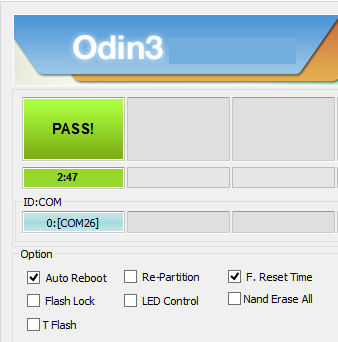
- Make sure that Auto Reboot and F.Reset Time options are checked in Odin.
Step-8
- Review the whole procedure again for faults and errors.
Step-9
- Now click click on the start button.

Step-10
- After you click the start the button Odin will start flashing the file. Wait for the process to complete. Odin will show Pass message when the whole process completes and your device will automatically reboots. Disconnect the cable when you see the home screen.
“That’s it guys, Congratulations. You have installed CWM Custom recovery on your Galaxy Note 3 N900. Now you can flash custom roms, install update file and can do many things using custom recovery. Thanks to all for following my tutorial.”
Boot into Recovery Mode to Check Custom Recovery
For checking the new custom recovery on your device you can boot into recovery mode and see your new custom recovery. Follow the steps below to boot into recovery mode.
- Turn off the device.
- Press and hold Home+Volume Up+Power button for few seconds and release.
Your device will boot into recovery mode. You can check your new recovery here labeled CWM Recovery on the top. You can Scroll down and up by Volume button and select by power button. You will also notice that this recovery is different from the stock Android 3e recovery. So, that’s it friends, now select Reboot System Now option to get out from the recovery mode.
Like, share and subscribe please. Any problems regarding this topic can be discussed in the comments section.


So, how to download cwm file?
the file only has recovery.img in it.
Kindly help
thanks yaar…great …i was stuck for five hours…visited ur sight ….get out of stuck in ten minutes….really great helpfull..thank youuuuuuuu
By mistake I deleted my samsung account and did foctory reset note 3 now device asking samsung account details to login but I deleted it. Now i created exact account again but showing process failed. Do you know how to fix it>>???
This is clear. Although I have not tried it but the instructions are so clear (with implications) that I have some confidence doing it.
Thanks For Sharing